🔧 Set Up Gatey and Add the Login Flow to Your Site
This tutorial walks you through using the Gatey admin panel, adding authentication blocks in the Gutenberg editor, and configuring a login page.
Step 1: Install the Gatey Plugin
You can install Gatey from your WordPress Dashboard by searching “Gatey” under Plugins → Add New and clicking Install Now.
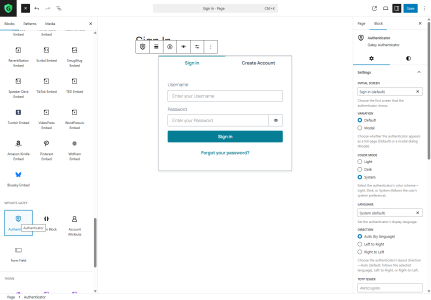
Step 2: Build Your Sign-In Page with the Authenticator Block
- Create the page: In the WordPress Dashboard go to Pages → Add New, set the title to Sign In, and keep the suggested slug
/sign-in(or choose your own). - Insert the block: In the block inserter open the WPSuite · Gatey section and drag the Authenticator block onto the canvas.
- Pick the initial screen: In the right-hand sidebar choose where the Authenticator should start (Sign In, Sign Up, Edit Account, …).
- Configure the language: Under Language choose the default display language for the authenticator. Select the primary language of your website (e.g. English for an English‑language site) instead of System. This avoids mismatches where the interface switches to the visitor’s browser language (for example, showing Hungarian text on an English‑only site).
- (Optional) Set a TOTP issuer: If your page connects to an Amazon Cognito user‑pool where MFA is enabled, fill in TOTP Issuer with a clear, short name (e.g. MyCompany). Authenticator apps will display this label next to the one‑time code, so users can easily identify which site the code belongs to.
- Style it: Select a variation (Default or Modal), colour mode, and alignment options.
- Save the page and preview it.
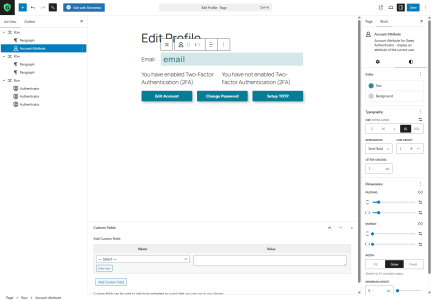
Step 3: Build an Edit Profile Page
- Create the page: Go to Pages → Add New, set the title to Edit Profile and set the slug to
/profile(or choose your own). - First row – email address: Insert a WPSuite · Gatey → Account Attribute block. In its inspector set Attribute to
email. Style it as a
heading if you wish. - Second row – MFA status: Add a two‑column Row (or Group) and type the following two paragraphs:
You have enabled Two‑Factor Authentication (2FA)You have not enabled Two‑Factor Authentication (2FA)
Give the first paragraph the CSS classmfa-enabledand the secondmfa-disabled. Paste the CSS below into
WordPress Dashboard → Settings → Editor Plus → Advanced → Global CSS:.mfa-enabled { display: var(--gatey-in-editor, var(--gatey-account-mfa-enabled, none)); } .mfa-disabled { display: var(--gatey-in-editor, var(--gatey-account-mfa-not-enabled, none)); } - Third row – quick actions: Add another Row. Drop three Authenticator blocks into the Row and set:
- Authenticator 1:
screen = editAccount, check Show Open Button. - Authenticator 2:
screen = changePassword, check Show Open Button. - Authenticator 3:
screen = setupTotp, check Show Open Button.
Switch to the Modal variation for each Authenticator block.
- Authenticator 1:
- Save the page. A live preview will work after you finish the next steps—setting Cognito User Pool attributes and enabling the WordPress integration.
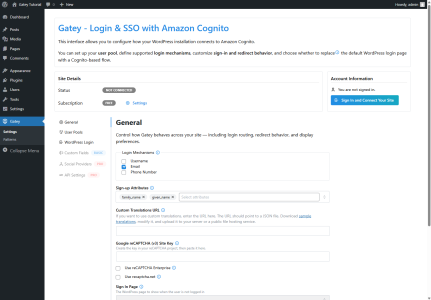
Step 4: Configure Gatey’s General Settings
- Open the General settings: In the WordPress Dashboard go to Gatey → Settings → General.
- Choose your Sign In Page: From the dropdown select the WordPress page you created earlier (e.g. Sign In). Gatey will redirect all unauthenticated traffic here, guaranteeing a consistent login flow.
- Select Login Mechanisms: Tick the ways users are allowed to sign in—Username, Email, and/or Phone Number. Pick the combination that matches your Cognito user‑pool configuration.
- Set Sign‑up Attributes: Add the Cognito attributes (e.g. given_name, family_name, email) that should be collected during registration. These same fields will automatically appear on the Sign Up and Edit Account screens.
- Add security with reCAPTCHA (optional): Paste your Google reCAPTCHA v3 Site Key to protect sign‑in and sign‑up forms from bots. (Enterprise or reCAPTCHA.net variants are also supported.)
- Provide a Custom Translations URL (optional): If you maintain your own JSON localization file, enter its public URL here so Gatey can load your custom labels and messages.
- Save Changes: Click Save at the bottom of the page.
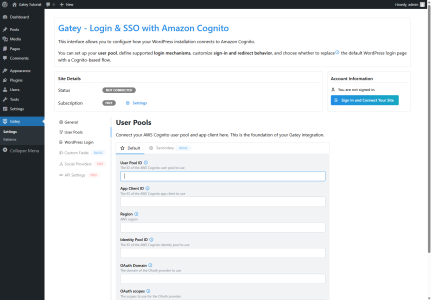
Step 5: Connect Gatey to Your Cognito User Pool
- Open the User Pools screen: In the WordPress Dashboard navigate to Gatey → Settings → User Pools.
- Enter your User Pool ID: Paste the ID of the AWS Cognito user pool you created (e.g.
us‑east‑1_AbC123xyz). Required. - Enter your App Client ID: Copy the Client ID of the app client associated with this user pool (e.g.
4f9u0example). Required. - Select the Region: Type the AWS region code where the user pool resides (e.g.
us‑east‑1). Required. - (Optional) Add an Identity Pool ID: Provide this only if you use Cognito Identity Pools for temporary AWS credentials.
- (Optional) Configure OAuth Domain and OAuth Scopes: Fill these when you plan to use the Cognito‑hosted UI or social logins.
openidis always required; addemail,profile, etc., as needed. - Save Changes: Click Save at the bottom of the screen.
Result: WordPress is now linked to your Cognito user pool, enabling Gatey to authenticate and register users via AWS Cognito.
Step 6: Optionally Enable WordPress Login Integration
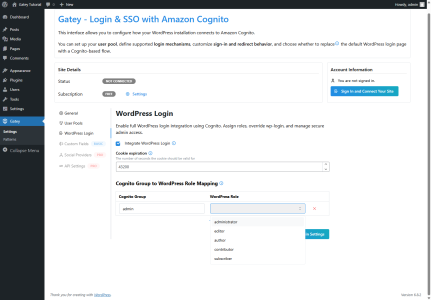
To fully replace the native WordPress login screen (/wp-login.php), go to WordPress Dashboard → Gatey → Settings → WordPress Login.
Enable the “Integrate WordPress Login” option.
This allows users who log in with Amazon Cognito to gain access to the WordPress backend (if their role allows).
The plugin automatically redirects the default WordPress login flow to the Cognito‑based screen you’ve configured.Don’t lock yourself out!
Before you enable the option, create a Cognito group that maps to the WordPress “Administrator” role, and add your own Cognito user to that group in the AWS Console.
Then, in the Cognito Group to WordPress Role Mapping table on this screen, map that group to Administrator.
This guarantees that you will still be able to reach the WordPress Dashboard after the native login page has been replaced.Once activated, your Cognito‑based login fully replaces
/wp-login.php— including admin access and any login‑required redirects.When WordPress Login Integration is enabled, you can assign WordPress roles to users based on their Cognito groups. Scroll to the Cognito Group to WordPress Role Mapping section:
Enter the exact name of each Cognito group (case‑sensitive).
Select the corresponding WordPress role from the dropdown list.
Users automatically receive the mapped role upon their next login.
If a user doesn’t match any mapped group, they receive the default role (or no access to the WordPress backend), depending on your configuration.
Step 7 – Show the Logged-In User & Add a Login/Logout Link
If you’re not using WordPress-login integration, you still need a clear “logged-in / log-out” indicator.
With Gatey you only have to drop two blocks into your existing menu row—no extra rows, no custom JavaScript.
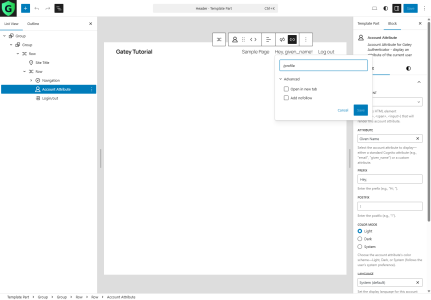
1 Open your Header template part
Appearance → Editor → Patterns → “Header”
2 Insert two blocks inside the existing navigation row
- Account Attribute block
- Attribute: Given Name (or whichever field you prefer)
- Prefix:
Hey, - Postfix:
! - Link:
/profile(or any profile page) - Additional CSS classes:
authenticated link - Typography → Size: M
- Login/out block
- Works automatically—shows “Log out” when signed in, “Log in” when not.
- Additional CSS class:
link - Typography → Size: M
Tip – The link class removes the underline until hover so these new items look identical to your menu links.
The authenticated class hides the greeting until a user is signed in.
3 Save the template part
Your header now greets logged-in users with “Hey, <Name>!” (linked to their profile) and displays a matching Log out link—no row duplication needed.
5 Add (or keep) the CSS
| Theme type | Where to add it |
|---|---|
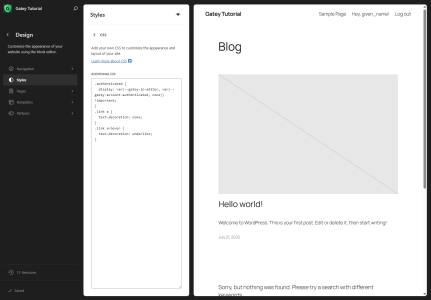
| Block themes (e.g. Twenty Twenty-Five) | Appearance → Themes → Customize (your active theme) → Styles → Additional CSS – direct link resembles:/wp-admin/site-editor.php?p=%2Fstyles§ion=%2Fcss |
| Classic / child themes | Appearance → Customize → Additional CSS or add to style.css |
					/* Toggle header rows */
.authenticated {
  display: var(--gatey-in-editor,
                var(--gatey-account-authenticated, none)) !important;
}

/* Typographic tweaks */
.link a { text-decoration: none; }

.link a:hover { text-decoration: underline; }
Visitors now see “Hey, John Log out” once they’re logged in, and the classic Log in link when they’re not—without relying on /wp-login.php.
🔄 Plugin Behavior and Fallbacks
When the plugin is active and a new user registers through Cognito, Gatey:
- Creates the user in the Cognito User Pool
- Also inserts the user into the WordPress database with the correct role (if WordPress is available)
This ensures WordPress-based features like dashboards or custom plugins still function.
Note: In headless setups (where WordPress is not running at registration time), local user sync will not occur — only Cognito will have the user record.
Gatey does not store passwords in WordPress. However, users can always reset their password later via Cognito if needed (or WordPress if Gatey is deactivated).
✅ You’re Done!
You now have a working Cognito login flow inside your WordPress site — visually integrated, and fully managed via Gatey.


