What AI‑Kit is (and why it feels different)
Most “AI for WordPress” plugins follow one of two paths: they either call a third‑party SaaS API (OpenAI / Anthropic Claude / Google Gemini / etc.), or they rely on the browser’s on‑device model in a best‑effort way. AI‑Kit is designed to be better at both ends: a stronger on‑device experience and a seamless PRO backend fallback when on‑device isn’t available.
Privacy‑first by default
On supported Chrome Desktop builds, AI‑Kit can use Chrome’s built‑in AI APIs (Writer / Rewriter / Proofreader / Summarizer / Translator, etc.). That means no API key dance for basic workflows, and no automatic content shipping to external services.
Where AI‑Kit stands out
- Smarter detection + event signals — you can reliably tell what’s available (and why), and build UX that reacts to real runtime state.
- Seamless PRO backend fallback — on the front‑end, AI‑Kit can switch the same UI components and JS flows to the backend without redesigning your pages.
- WYSIWYG front‑end UI — Feature blocks + shortcodes make it easy to expose AI actions to visitors, while the JS API lets devs build custom UI on top.
When you need more power (or broader browser coverage), AI‑Kit can optionally use a backend fallback — deployed into your own AWS account. That matters: AWS here works as “bring your own cloud” infrastructure (more PaaS‑like than SaaS), so you keep far more control over data flow, retention, and operational policies than with a shared third‑party AI API.
Admin screens and where settings are stored
AI‑Kit’s admin experience is intentionally split into configuration, diagnostics, and editor-level tools. This keeps the global baseline predictable, while letting editors access AI features exactly where they write.
Global settings (stored in wp_options and exposed to the front end via WpSuite.plugins.aiKit.settings)
Core plugin settings live under:
- WP Admin → SmartCloud → AI‑Kit Settings

These settings are the “local” truth for AI‑Kit. Use them to control baseline behavior like defaults, availability checks, and general feature behavior.
Diagnostics (environment + availability checks)
AI‑Kit also provides a dedicated diagnostics screen:
- WP Admin → SmartCloud → AI‑Kit Diagnostics

PRO editors (stored in hosted WPSuite site settings)
Some PRO configuration surfaces are available in the admin UI, but they are stored in your hosted site configuration on wpsuite.io (not in WordPress options). These become available after:- WP Admin → SmartCloud → Connect your Site to WPSuite
The two key PRO editors are:
- API Settings Editor — backend connectivity and related controls
- Chatbot Settings Editor — chatbot behavior, scope, and UX configuration

Why split storage?
WordPress options are perfect for local defaults and safe baseline behavior. Hosted site settings are great for PRO features that benefit from centralized management (agency workflows, consistent settings across environments, and backend connectivity).Editor tools: image metadata, language utilities, AI sidebar
AI‑Kit doesn’t limit AI to front‑end widgets. It also adds editor‑level tools inside WordPress, so authors can generate copy, improve text, and create SEO‑friendly image metadata while they work.
AI‑Kit Sidebar (Gutenberg)
Inside the block editor, AI‑Kit adds a dedicated sidebar panel (AiKitSidebar). From a user perspective it behaves like a native editor sidebar: you open it and run AI actions that work with the current post.
Typical sidebar workflows:
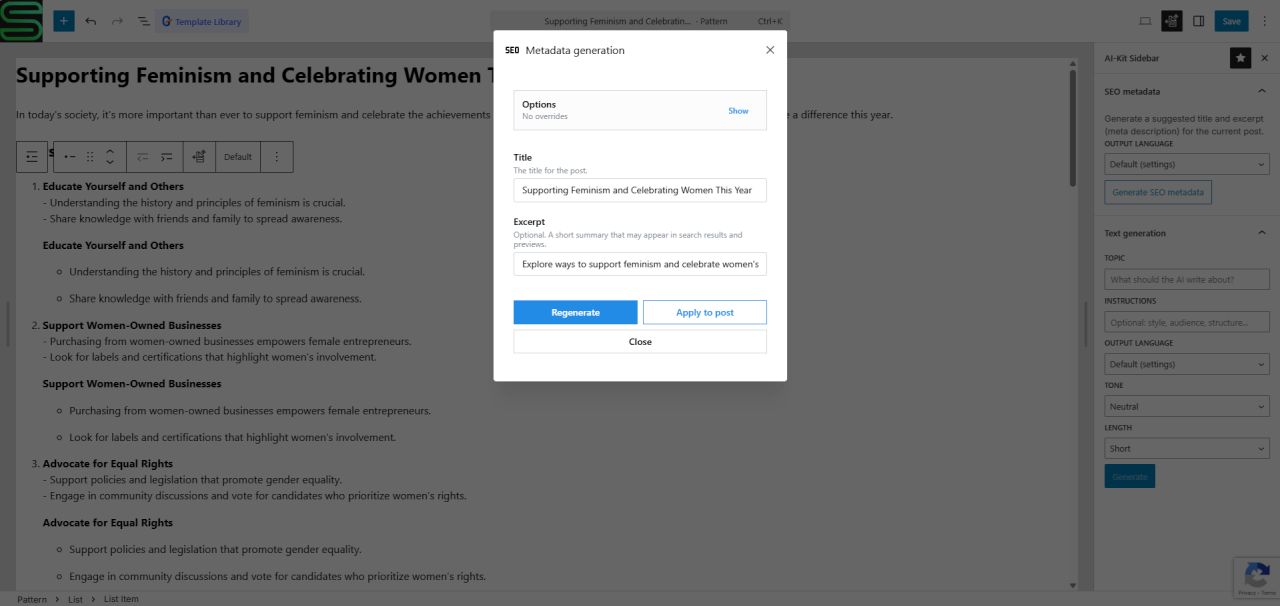
- Generate post SEO metadata (e.g. title + excerpt/description) from the current content, then apply the results back to the post fields.
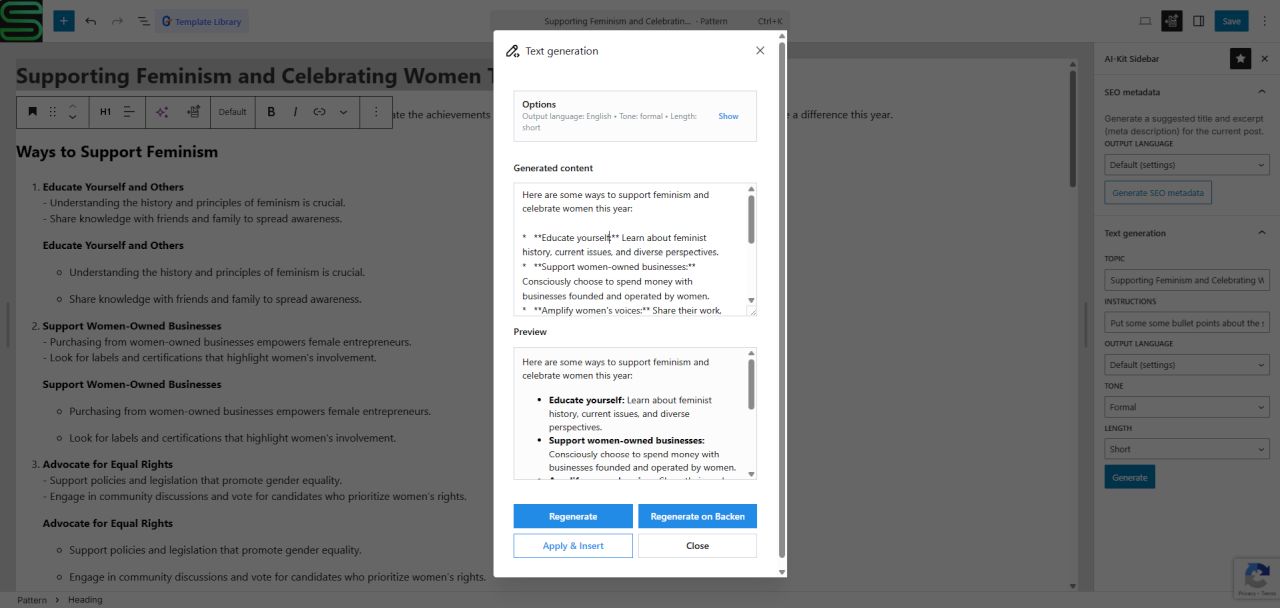
- Text generation (draft paragraphs, bullet lists, intros) with tone/length/language controls, with an Accept/Apply action.
Inline Language tools (block toolbars)
For text blocks, AI‑Kit can surface quick language actions right in the Gutenberg toolbar (LanguageUtils) — think “proofread / translate / rewrite” style helpers without leaving the canvas.
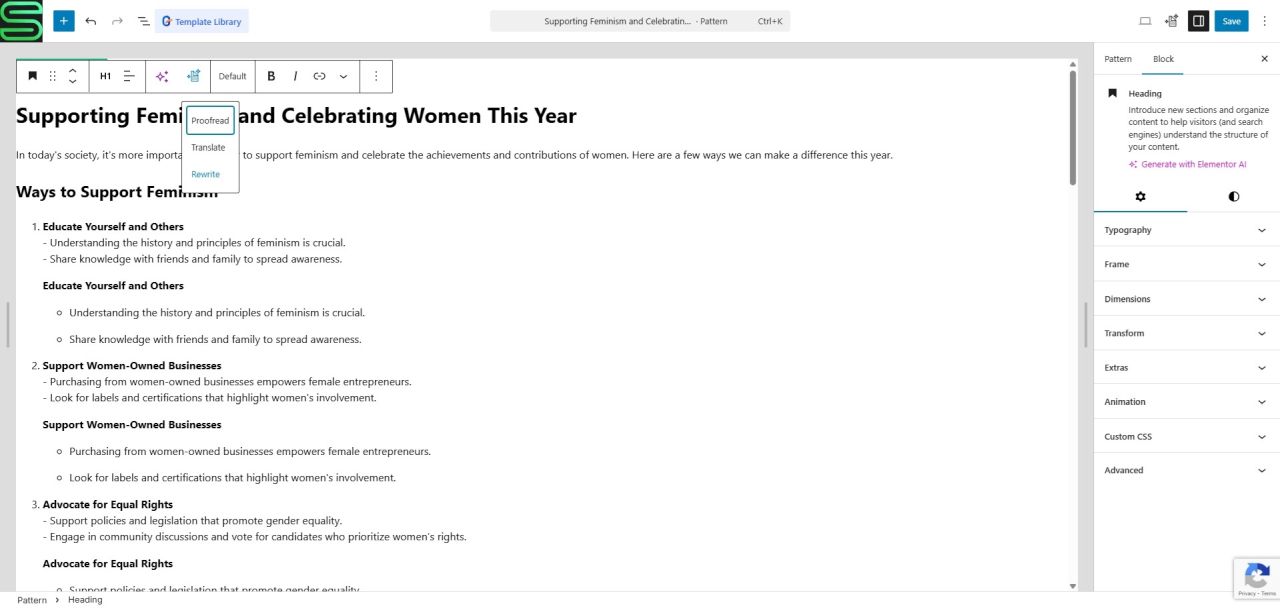
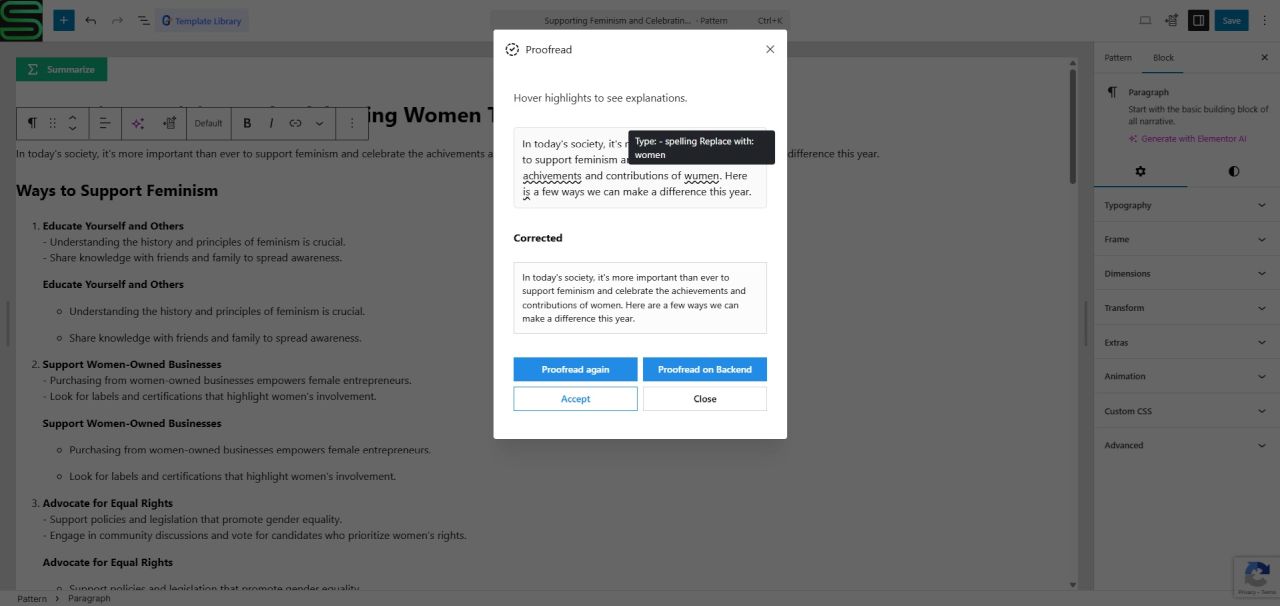
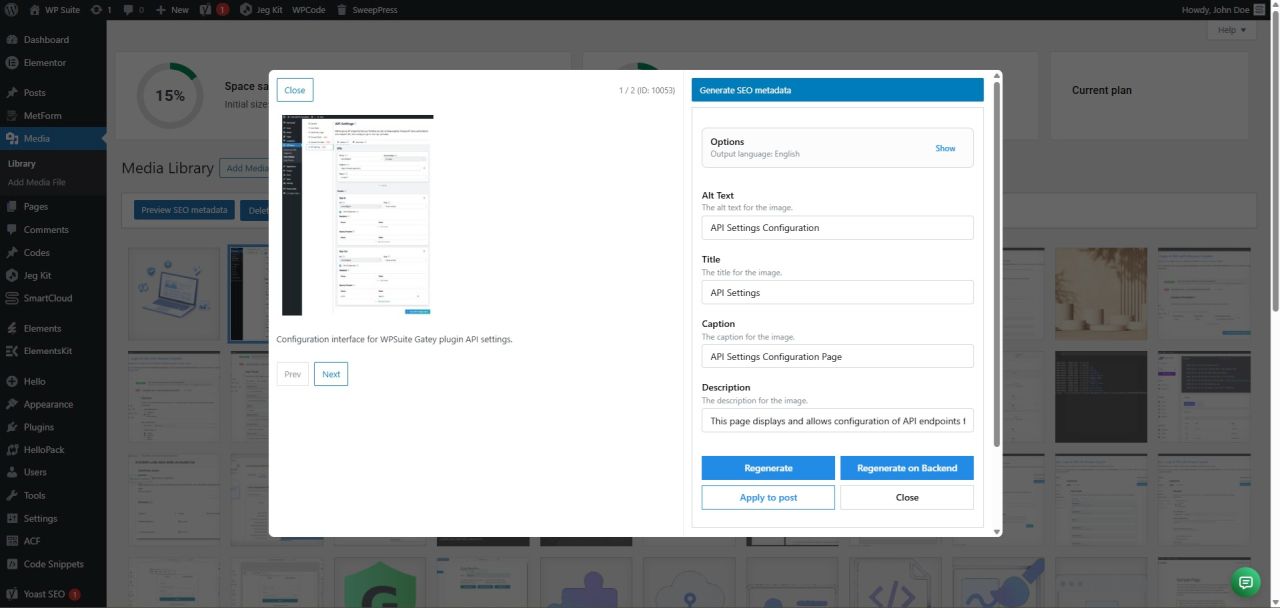
Image metadata generation (blocks + Media Library)
AI‑Kit can help with image SEO and accessibility by generating drafts for common fields such as alt text, title, caption, and description.
You’ll see this in two main places:
- Gutenberg image-like blocks such as
core/image,core/cover,core/media-text(UI component often referenced asGenerateMetadataBox/ImageExtra). - Media Library tools (
MediaLibrary) — including attachment screens and bulk flows.

The AI‑Kit Feature block + shortcode (PRO)
The AI‑Kit Feature UI (Pro) is the main way to expose on‑page AI actions to visitors. You can use it in two forms:
- Gutenberg block — add “AI‑Kit Feature (PRO)” in the editor and configure it in the inspector.
- Shortcode — use the same UI outside Gutenberg (Elementor, Classic Editor, templates).

The shortcode
The shortcode name is:
smartcloud-ai-kit-feature ... 
Parameters you’ll use most
The shortcode mirrors the Feature UI props used by the Gutenberg block and the JavaScript API. These are the most common parameters:mode—summarize | write | rewrite | translate | proofreadvariation—default | modaltitle— header label (panel or modal)language— UI language (e.g.en,de,hu)direction—ltr | rtl | auto
Theming & appearance
These map to the same Mantine theme options used across the AI‑Kit UI:colorMode—light | dark | autoprimaryColor— a Mantine color key (or your custom color key)primaryShade— number (0–9) or{ light, dark }colors— optional custom named colorsthemeOverrides— a CSS string merged into the component theme
Default values and overrides
Most modes support adefault payload and an allowOverride switchboard. Together they let you prefill content and decide what the visitor can change.
default.text/default.instructionsdefault.inputLanguage/default.outputLanguage(autosupported)default.tone,default.length,default.type(where applicable)default.outputFormat—plain-text | markdown | htmlallowOverride.*— enable/disable controls per fieldautoRun— useful for “one click → open modal → start immediately” demosonDeviceTimeout— per‑feature timeout override
Shortcode default values (if not specified)
allowOverride: everythingtrueexceptoutputFormat(defaultfalse)autoRun:trueeditable:truevariation:defaultshowOpenButton:trueshowOpenButtonTitle:trueshowOpenButtonIcon:trueacceptButtonTitle:"Accept"optionsDisplay:"collapse"
Input selection: where the Feature reads text from
Feature blocks and shortcodes take their source text frominputSelector. If you don’t set it, the default is document.body.
Write mode exception: write can also take a prefilled default.text so you can render “one‑click” buttons that instantly draft content (e.g. a support ticket). Other modes rely on inputSelector.
Practical pattern
UseinputSelector to point to a textarea or a specific content container. The Feature UI will read from there, and the Accept action can apply the result back via the output selector configuration.
Copy‑paste recipes: shortcode configs (with YAML)
Below are practical recipes you can reuse in Elementor. Replace selectors, labels, and icons as needed.
Tip: For “demo toolbar” style, set variation="modal" and hide the open button title. Use openButtonIcon for compact icon controls.
“Write” — one click generates content into the textarea
This is great for demos: the visitor clicks once and gets a full piece of text. Topic + instruction are prefilled, so there’s no prompt typing.
smartcloud-ai-kit-feature mode="write" variation="modal"
openButtonTitle: Write me a short product intro
optionsDisplay: collapse
default:
  text: "Write a short product intro for AI-Kit. Keep it friendly and practical."
  tone: casual
  length: short
  outputFormat: markdown
themeOverrides: |
  .ai-feature-open-button {
    width: 100%
  }
/smartcloud-ai-kit-feature
“Rewrite” — improves what’s already in the textarea
smartcloud-ai-kit-feature mode="rewrite" variation="modal" showOpenButtonTitle="false" openButtonIcon="data:image/svg+xml;base64,..."
inputSelector: h2:first-child
default:
  tone: more-casual
  length: shorter
allowOverride:
  instructions: false
  length: false
  tone: false
/smartcloud-ai-kit-feature
“Proofread” — safe edits (grammar + clarity)
smartcloud-ai-kit-feature mode="proofread" variation="modal" showOpenButtonTitle="false" openButtonIcon="data:image/svg+xml;base64,..."
inputSelector: h2:first-child
/smartcloud-ai-kit-feature
“Translate” — auto-detect + output language
smartcloud-ai-kit-feature mode="translate" variation="modal" colorMode="dark" primaryColor="cyan"
inputSelector: h2:first-child
default:
  inputLanguage: auto
  outputLanguage: ar
themeOverrides: |
  .ai-feature-open-button {
    width: 100%
  }
/smartcloud-ai-kit-feature
“Summarize” — compact overview
smartcloud-ai-kit-feature mode="summarize" variation="modal" showOpenButtonTitle="false" openButtonIcon="data:image/svg+xml;base64,..."
inputSelector: h2:first-child
default:
  length: short
  type: key-points
  outputFormat: html
/smartcloud-ai-kit-feature
Note on icons
openButtonIcon expects a base64 Data URL. For a consistent look, use a single icon set (same stroke weight) and keep them small (18–20px).
JavaScript API: run features without UI + log events
If you prefer fully custom UI (or no UI), AI‑Kit exposes a JavaScript API under the WP Suite global:
globalThis.WpSuite.plugins.aiKit— plugin objectglobalThis.WpSuite.plugins.aiKit.features— feature methods + UI helperrenderFeature()

Minimal example: rewrite + status events
Open your browser DevTools (press F12 on Windows / Linux, or ⌥⌘I on macOS) and switch to the Console tab. Then copy the snippet below, paste it into the console, and press Enter.
The script reads the current text from the demo textarea, runs Rewrite, and writes the result back into the same textarea so you can immediately compare before/after. While it runs, you’ll also see status events logged in the console — for example on-device:download, on-device:run, backend:request, and finally done. When you see done, the run has finished.
Every feature method accepts an optional FeatureOptions object where you can pass onStatus. The callback receives an AiKitStatusEvent describing the current step and progress.
					/*
Quick demo: open DevTools (F12), paste the code below, and see AI-Kit rewrite the textarea content while logging its status events.
*/
(async () => {
  const ai = globalThis.WpSuite?.plugins?.aiKit?.features;
  if (!ai) return;

  const textarea = document.querySelector('#ai-kit-javascript-demo');
  if (!(textarea instanceof HTMLTextAreaElement)) return;

  const input = textarea.value;

  const { result } = await ai.rewrite(
    {
      text: input,
      // Optional: influence the output
      tone: 'neutral',
      length: 'short',
      outputLanguage: 'en',
      // Optional: sharedContext can be set globally in settings too
      // sharedContext: 'Write for a WordPress product page.',
    },
    {
      onStatus: (e) => {
        console.log('[AI‑Kit]', e.feature, e.step, e.progress ?? '');
      },
      // Optional overrides:
      // modeOverride: 'backend-fallback',
      // onDeviceTimeoutOverride: 45000,
    }
  );

  textarea.value = result;
})();
Proofread example: apply correctedInput
Use the same textarea above as input, then paste the snippet into the Console to apply Proofread and write the corrected text back into the textarea.
					// Proofread returns dom-chromium-ai's ProofreadResult shape
(async () => {
  const ai = globalThis.WpSuite?.plugins?.aiKit?.features;
  const textarea = document.querySelector('#ai-kit-javascript-demo');
  if (!ai || !(textarea instanceof HTMLTextAreaElement)) return;

  const { result } = await ai.proofread(
    {
      text: textarea.value,
      includeCorrectionTypes: true,
      includeCorrectionExplanations: true,
    },
    { onStatus: (e) => console.log('[AI‑Kit]', e.step) }
  );

  console.log(`Corrections: ${JSON.stringify(result.corrections, null, 2)}`);
  textarea.value = result.correctedInput;
})();
UI injection: renderFeature()
TherenderFeature() API supports almost the same set of properties as the shortcode and the Gutenberg block.
The main difference is that inputSelector and outputSelector are not used here, because the calling code can directly provide the default text and the onAccept handler (which are otherwise automatically wired by the block and the shortcode via the input/output selectors).
In this case, default.text is mandatory for all modes (not just for write): if it is not provided, the feature will not run and no UI interaction will occur.
Instead, renderFeature() introduces a new target property, which defines where the AI Feature component will be injected into the DOM — making it possible to render the feature directly at any specific location in the page.
					// Inject a Feature UI into a container
globalThis.WpSuite?.plugins?.aiKit?.features?.renderFeature(
  {
    mode: 'summarize',
    variation: 'modal',
    editable: false,
    language: 'en',
    colorMode: 'light',
    primaryColor: 'cyan',
    default: {
      text: document.querySelector("#ai-kit-render-feature-example").innerText,
      outputFormat: 'html'
    },
    onAccept: (generated) => console.log(generated)
  }
);

Browser support: minimum Chrome versions + Origin Trials
AI‑Kit’s on‑device features are built around Chrome Desktop. This is where you get the best, most predictable experience.
Minimum Chrome versions (per feature)
| Feature | Minimum Chrome | Notes |
|---|---|---|
| Writer | 137+ | Requires Origin Trial |
| Rewriter | 137+ | Requires Origin Trial |
| Proofreader | 141+ | Requires Origin Trial |
| Prompt | 138+ | Requires Origin Trial |
| Summarizer | 138+ | Available without Origin Trial in supported builds |
| Translator | 138+ | Available without Origin Trial in supported builds |
| Language Detector | 138+ | Available without Origin Trial in supported builds |
Origin Trial requirements
Some Chrome built-in AI APIs (currently Writer, Rewriter, Proofreader, and Prompt) are only available behind Origin Trials.
AI-Kit automatically detects this and displays the exact requirements at the bottom of the SmartCloud → AI-Kit Diagnostics screen, including the needed Origin Trial tokens and Chrome flags — so you can immediately see why a feature is unavailable and how to enable it.

Pro Tips & Common Mistakes
Pro Tips
- Use
inputSelector+outputSelectorto create a clean “editor toolbar” UX around a single textarea. - Enable
editablewhen you want users to refine AI output in the modal/inline preview before pressingAccept. - Prefer a modal UI for longer outputs (Rewrite / Translate / Summarize) and inline UI for quick edits (Proofread).
- Keep the default demo text short and meaningful; users are more likely to try multiple features if the first run feels instant.
- Add a small event log (via the JS API) during onboarding so developers can see feature lifecycle and troubleshoot quickly.
- If you expect many visitors from non‑Chrome browsers, consider a friendly hint like “For on‑device AI, open this page in Chrome Desktop (version X+).”
Common Mistakes
- Expecting AI-Kit to “find” the right text automatically — features read input from
inputSelectorunlessdefault.textis set. - Forgetting
outputSelectorand wondering why nothing is inserted — without it, the feature can remain preview-only unless you handleonAccept. - Testing on unsupported browsers — on-device AI is reliable only on Chrome Desktop, and some features require Origin Trials.
- Using selectors that match multiple elements (or elements that load later) — bind to a unique, stable element ID.
- Overly strict timeouts on first run — the initial model readiness/download can take longer than subsequent calls.
Key Takeaways
- AI-Kit brings on-device AI editing tools to WordPress — no API keys required for the core experience.
- Features are consistent across blocks, shortcodes, and the JS API thanks to the same input → preview → accept flow.
inputSelectordefines where text comes from;outputSelectordefines where accepted output goes.editablelets users refine generated text inside the preview UI before accepting changes.- For advanced use cases,
renderFeature()mounts the UI anywhere in the DOM while selectors control the text binding. - When you need broader compatibility or chatbot/KB features, you can pair AI-Kit with an optional backend deployed into your own AWS account.